
Backing up and Restoring MS SQL Databases

Macrium Reflect Server Plus includes several features that are useful when backing up data that is stored in a MS SQL Database. This includes the ability to backup and restore individual databases.
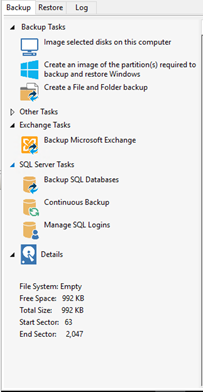
To create a backup of your MS SQL Database you can create an image of the volumes that contain SQL Databases or use the ‘Backup SQL Databases’ option. The former will include all databases on selected volumes and not allow for granular backup and restore. The latter will allow for granular backup, restore and to point in time.
Granular backup is achieved by first selecting ‘Manage SQL Logins’ under the ‘SQL Server Tasks’ on the ‘Backup’ page.
Macrium Reflect will enumerate the available SQL instances and display them.
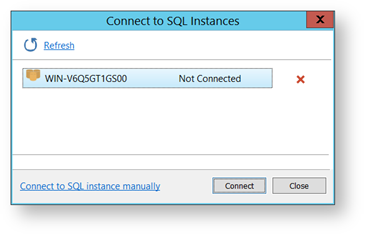
If necessary, you can manually connect to these SQL instances by selecting the SQL instance and then ‘Connect’. This will open a window where you can enter the authentication details for that instance. You can choose from either ‘Windows Authentication’ or ‘SQL Server Authentication’.
Full Backup
Now that Macrium Reflect can access the SQL Database, you can start taking your backups. To do this, select ‘Backup SQL Database’. This will present you with a list of the available SQL databases that you can backup.

Once you have selected the databases that you want to include, and the destination for where the SQL backups will be stored, select ‘Next’. You can then define a schedule and the retention rules for this backup:
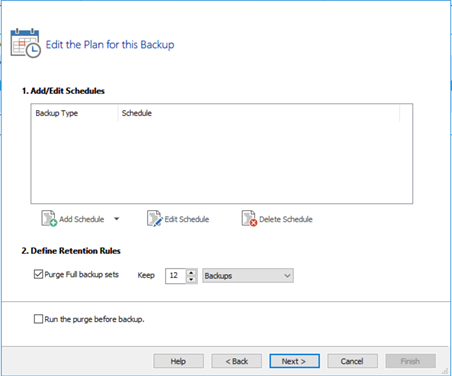
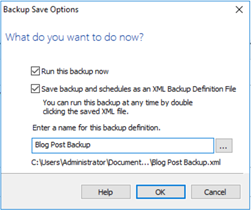
Once you have selected your schedule and retention rules, select ‘Next’ to review what will be included in the backup. Once you are happy with your backup configuration, select ‘Finish’. You will then have the options to save this backup and schedule as an XML Backup Definition File. This will make editing the backup in the future easier. You can also choose to run the backup now, deselecting this will wait for the backup to run at the next scheduled time.
Continuous Backup
Alternatively, you can perform a ‘Continuous Backup’ of your SQL databases. This will ensure that frequent backups of the selected databases take place at the predefined time intervals. This means you will always be able to restore your database as close to the desired point in time as possible.
Note: You can only run continuous backups on databases that are running Full Recovery Mode.
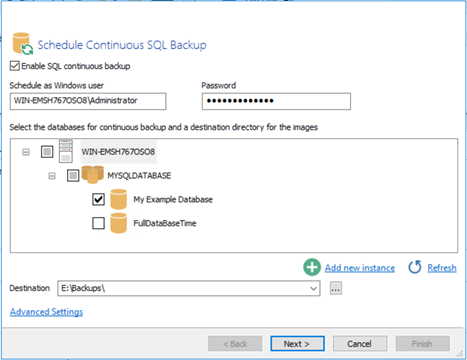
To perform a Continuous Backup of database, select the ‘Continuous Backup’ option in the Macrium Reflect ‘Backup’ tab.
Next, select the databases that you want to be included in the continuous backup. If necessary, enter the credentials that will be used to run the scheduled backup. This user must have authentication to access the SQL Database that is being backed up.
Once you are happy with these settings, select ‘Next’ to start configuring how the Continuous Backup will run.
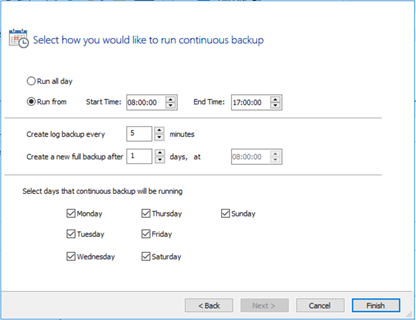
Using these settings, specify how often you want your continuous backup to take place. The full backup is used to restore the database. The log backups are used to restore that database to a certain point in time, by restoring the transactions that have took place to that database. Once you are happy with your configuration, select ‘Finish’. Your continuous backups will now run at the specified interval.
Restoring
Now that you have backups of your SQL Database, they can be restored in the event of an emergency or to perform a point in time restore. To restore your SQL Database, select the ‘Restore’ tab in Macrium Reflect, then ‘SQL Server Restore’.
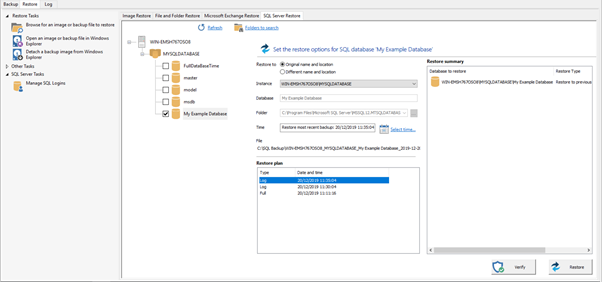
This tab contains several options and pieces of information. The first step is to select the database that you want to restore. Next to the list of databases, you will see several options for performing the restore. The first option is ‘Original name and location’ or ‘Different name and location. Selecting ‘Original name and location’ will revert the existing database back to the point in time that the backup you restored was created. Selecting ‘Different name and location’ will create a new database in the specified location, that contains the information from the backup that you restored. Once you have selected an option, you can then specify the SQL instance or new location that the database will be restored to. Now that the options for the database you want to restore have been selected, you can select a ‘Restore Plan’, this will be the data and time that the backup will be restored to. An example of what you will see in the ‘SQL Server Restore’ tab is shown below:
When you are finished, select ‘Restore’. A Window will then open that will show you a breakdown of the restore that will be performed. It is advised that all settings are double-checked before you perform the restore. Once all setting have been checked, select ‘Restore’.
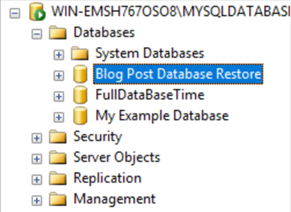
If you selected to restore the backup to a ‘Different name and location’ your new database can then be viewed in the ‘Microsoft SQL Server Management Studio’.
Download a 30-Day Trial of Macrium Reflect Server Plus here.